Ever wonder how blockbuster movies create those stunning, real-time graphics? Those futuristic HUDs, interactive floating text, and dynamic interface panels aren’t magic—they’re the result of precision motion graphics. Using Mocha Filmora, you can have the same energetic style of the cinema in your projects, which do not require a full studio setup or complex tools.
Such effects are not confined to big screens; they can be used for YouTube videos, commercials, music videos, brand reels, and even short movies. If you are aiming for your visuals to be more crisp, clever, and purposeful, then this tutorial will take you through the process from start to finish.
LOCAL NEWS: Phoenix housing market outpaces national trends again in 2025
INDUSTRY INSIGHTS: Want more news like this? Get our free newsletter here
Part 1: Understanding Hollywood-Style Motion Graphics
One of the things you will spot in the movies made for the mass market is the use of graphics that are animated and give an impression that they are part of the actual environment, like glowing maps, futuristic HUDs, digital panels, or titles that are mixed with the scene without showing any break. Such motion graphics are used to portray the characters of the movie interacting with the real world in a typical and deeply engaging manner.
At their core, motion graphics are animated design elements added to enhance storytelling. What gives them that “Hollywood-style” finish is the mix of realism, clean movement, and precise perspective tracking.
Here’s what sets cinematic motion graphics apart:
- Seamless Blending: The graphic looks like it belongs inside the scene.
- Smooth, Dynamic Motion: No jittering or awkward jumps.
- Accurate Perspective: Titles shift as the camera moves, maintaining realism.
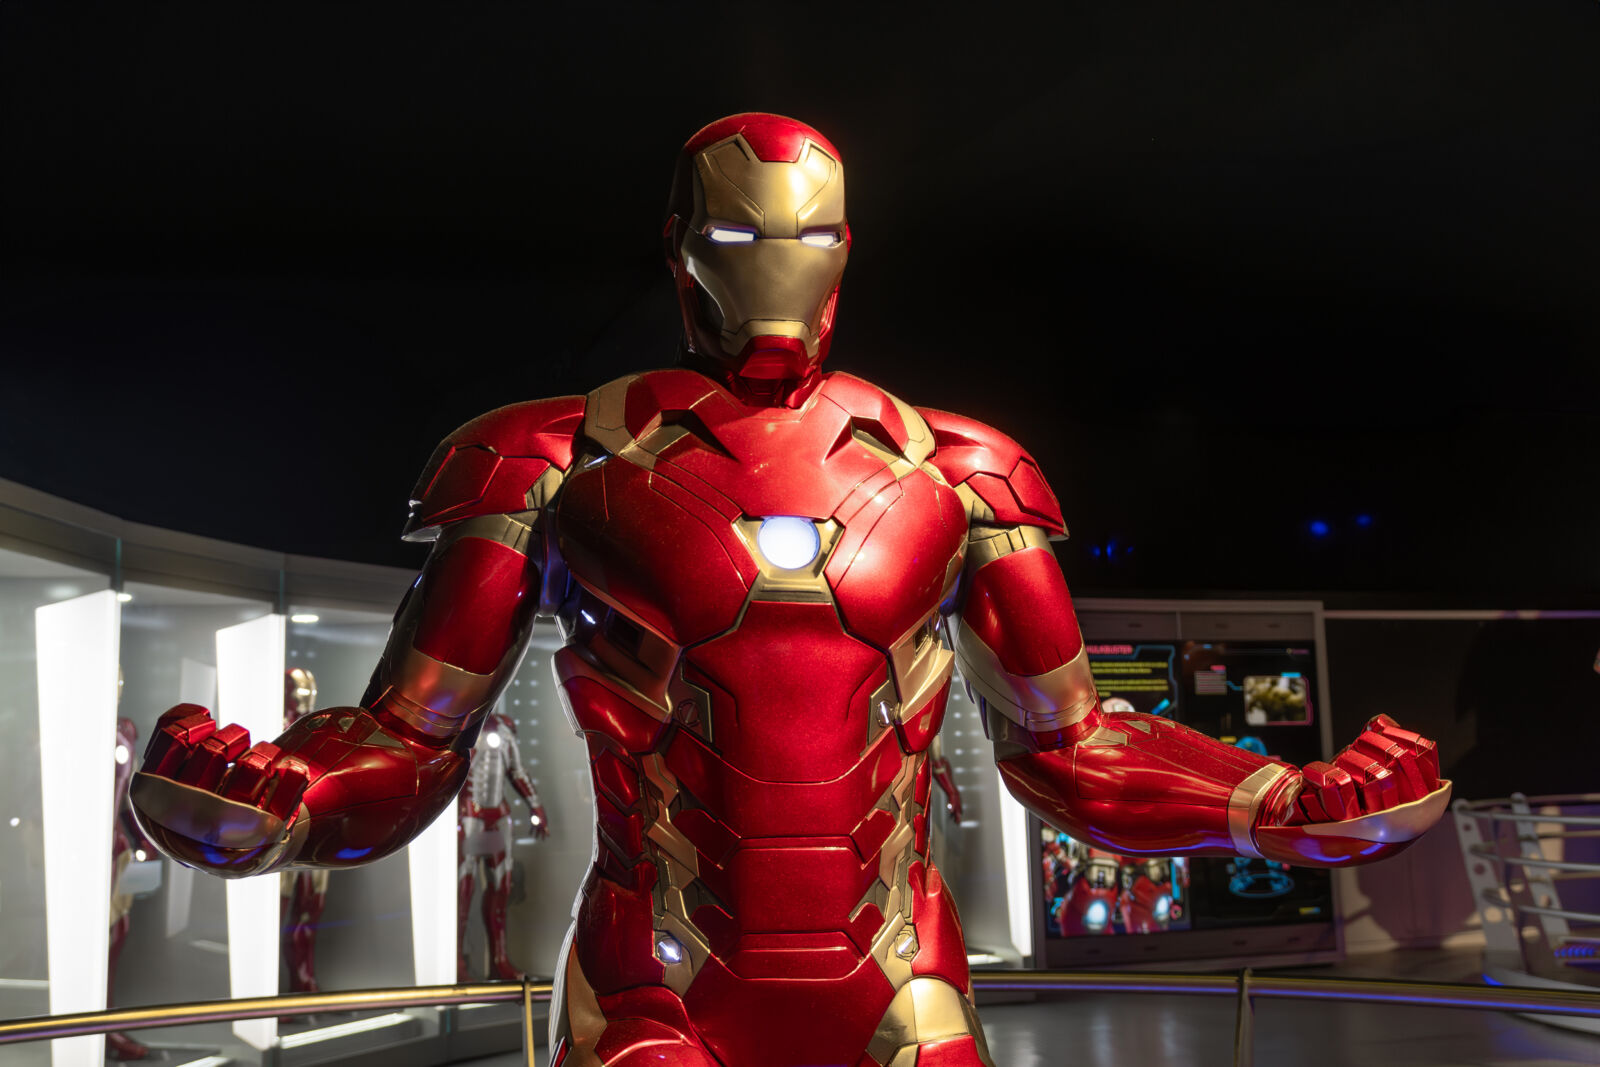
Think about the iconic Iron Man HUD visuals, transparent screens, rotating meters, and dynamic data labels that move exactly with Tony Stark’s head. That polished integration is what creators try to achieve, and with Mocha Filmora, it’s finally accessible even without Hollywood-level tools.
Part 2: Why Mocha Filmora Is a Game-Changer for Motion Graphics
What makes Mocha Filmora stand out is its ability to track movement with accuracy that feels almost invisible. Instead of relying on basic point tracking, it uses planar tracking, which reads the motion of entire surfaces. This means your graphics don’t just follow movement; they match perspective, angle, and depth as if they’re genuinely part of the environment.
Creators love Mocha Filmora because it simplifies a process that used to require heavy software like After Effects. Now you can attach titles, HUD elements, or interface graphics to walls, screens, objects, or even clothing with studio-level precision.
Here are some features that make it ideal for motion graphics work:
- Planar Tracking: Perfect for adding graphics to flat surfaces like doors, signs, screens, or tables.
- PowerMesh Tracking: Handles curved or flexible surfaces with natural distortion.
- Stabilization & Perspective Correction: Smoothes shaky clips and preserves realistic depth.
- Instant Integration with Filmora Tools: All Filmora titles, overlays, and effects blend effortlessly.
The biggest benefit? Absolutely, you can get fancy, top-tier, cinematic-type results right out of your single software without having to switch back and forth between multiple tools. Wondershare Filmora, along with the mocha plugin, is basically a dream workflow that’s rapid, user-friendly, and strong in its features; thus, it’s perfect for novices, creatives, and video editors seeking additional command but without complicated stuff.
Part 3: Plan Your Motion Graphics Shot
Before jumping into tracking and animation, a little planning goes a long way. Hollywood-style motion graphics look clean because they’re designed with the scene in mind. Choosing the right clip and mapping out your idea ensures the final result feels intentional, not forced.
When preparing your shot, focus on:
- Good lighting: Consistent lighting helps Mocha track surfaces accurately.
- Clear motion: Avoid overly chaotic scenes. Steady movement produces better results.
- Logical placement: Decide where your graphics will appear on a wall, phone screen, dashboard, or moving object.
Sketching a rough layout of your motion design can also be very helpful. Just a quick doodle will give you guidance when you start tracking in Filmora. Mincing your time for preparation can save you a lot of time for rework and your motion graphics can mix naturally with the footage.
Part 4: Step-by-Step Guide: Recreate Hollywood-Style Motion Graphics
When your idea is clear, it is the right time to make those filmic ideas real. Using Mocha Filmora, the process is effortless, attractive, and user-friendly in a way, if you are only experimenting with advanced motion graphics. Use this sequential manual to construct high-quality, visually tracked graphics that blend seamlessly with your shots.
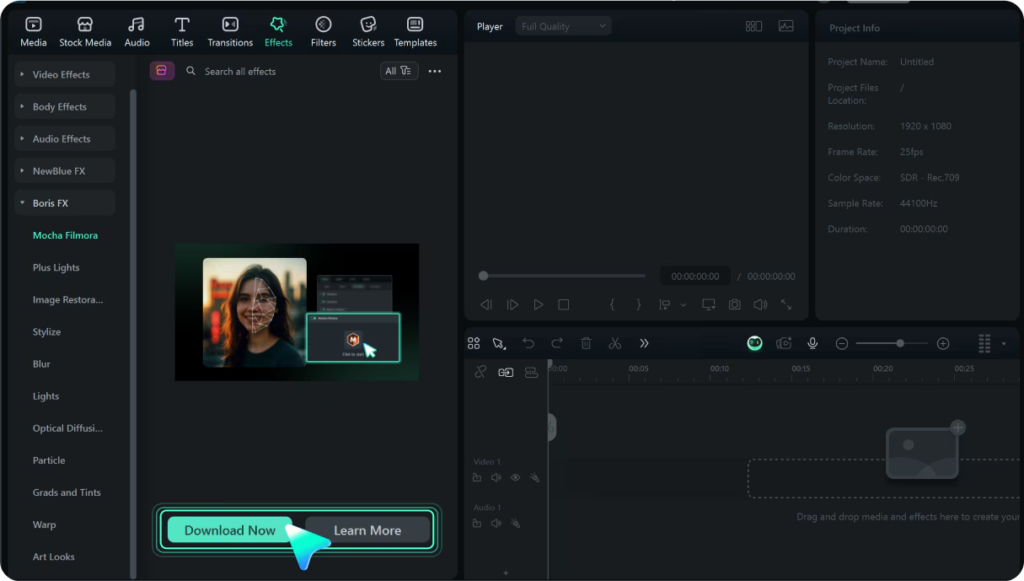
Step 1: Download the Mocha Plugin
Open Wondershare Filmora and head to Effects → Boris FX → Mocha Filmora. Click “Download Now” to install the Mocha plugin. Once installed, it becomes instantly available in your Effects panel, ready to use in any project.
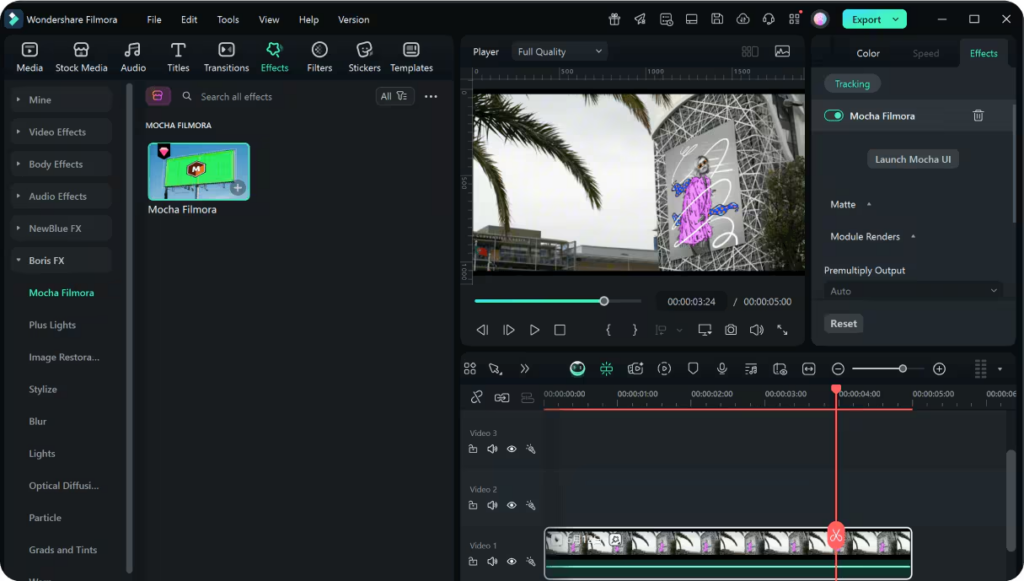
Step 2: Apply Mocha Filmora to Your Clip
Drag the Mocha Filmora effect onto your video clip in the timeline. As soon as you drop it, Filmora loads the tracking module dynamically and gives you the option to enter the Mocha interface. This is where the real motion tracking magic begins.

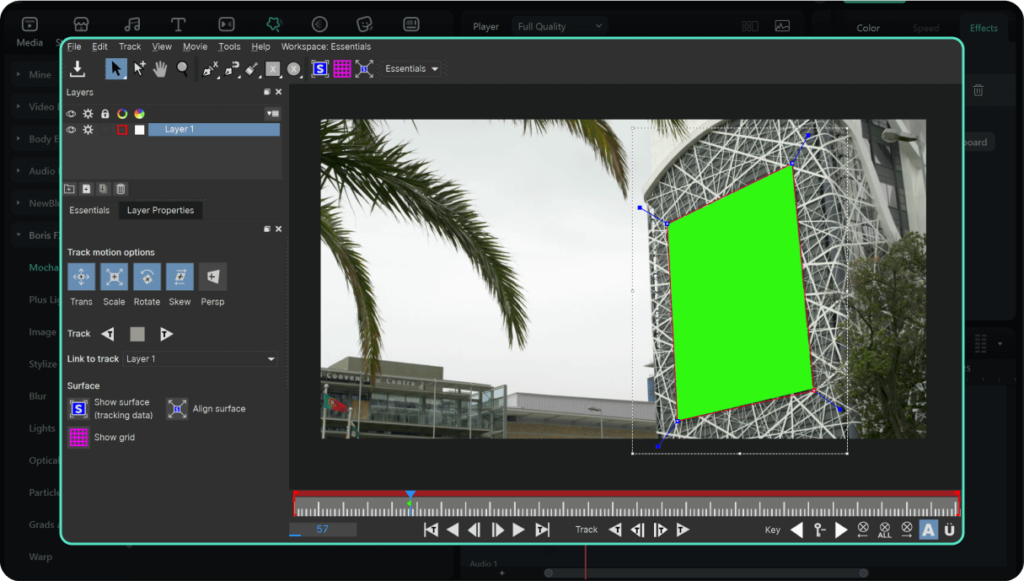
Step 3: Track Your Footage with Mocha
Click “Open Mocha” to launch the Mocha Filmora interface. Use splines (the shape tools) to outline the area you want to track—whether it’s a screen, logo, face, package label, or object surface. Once your shape is ready, start tracking.
Mocha handles:
- Planar tracking
- Masking
- Stabilization
- Perspective adjustments
This is the same technology trusted in professional VFX pipelines, now simplified for Filmora users.
Step 4: Export Data Back Into Filmora
After tracking, export your tracking data, masks, or effects directly back into Filmora. Your tracking attaches instantly to your clip, letting you continue editing without any interruptions.
Play through the timeline and make final adjustments to timing, motion, or visual balance. Once you’re satisfied, export your clip in your preferred format. Your Hollywood-style motion graphic is now ready to share across any platform.
Part 5: Pro Tips to Enhance Your Motion Graphics
A few creative adjustments can change the overall sense of your motion graphics to be richer and cinematic. After you have good tracking, change your attention to the mood and movement of the clip—the smallest things are often the ones that make the biggest difference.
Try these techniques to level up your results:
- Blend Mocha tracking with Filmora keyframing for layered, dynamic animations.
- Add light flares, dust, or glow overlays for a film-like atmosphere.
- Sync animations with beats, transitions, or spoken cues.
- Keep the design clean and minimal for a polished Hollywood feel.
All these changes bring depth, rhythm, and character, making your graphics merge smoothly with the world of your video.
Conclusion
Using Mocha Filmora, luxurious Hollywood-styled motion graphics aren’t a thing that could only be done in professional studios anymore. Just by having precise tracking, simple integration, and creative control, you can now achieve it right in Filmora. The use of these tools means a great expansion of the possibilities of narrative for the cinema without the need for complex software if you are editing YouTube videos, reels, client promos, or short films.
Want to take your visuals a step further? Get started with Wondershare Filmora and the mocha plugin to create motion graphics that have a strong, contemporary, and lasting vibe.