We’ve all been there. You’ve slept through your alarm and don’t have much time to get ready for work. And if you’re having a bad hair day, it can be like a girl’s worst nightmare. The messy buns or loose pony tails are cute, but for the the workplace it’s important to try something a little more sophisticated and put together. Here are six quick and easy hairstyles that take the messy bun and loose ponytail to a whole new level.

1. Tuck and roll
(Courtesy of Buzzfeed)
First, slide on a stretchy headband to hold back hair. Begin by sliding on a stretchy headband to hold back the front part of your hair. Place a second headband over top, but this one will over your forehand and will hold the hair in as it’s tucked. Starting with the left side of your head, take a 1-1 ½” inch section of hair and roll it up to the headband and tuck it in. Make sure to pull the hair so it sticks. Then pick up a 1” section of hair and combine it with the previously tucked strands and roll it up and into the headband. If strands of hair loosen up and fall out, just pull them back up and tuck them into the band. Continue adding pieces of hair to the previously tucked strands until all your hair is tucked into the band. this method of adding in hair to the tails of the previously tucked strands until you’ve tucked in all the hair. Last step is to slide the headband back just a little bit over your hair until it falls over the top of the first headband and hides it. To make sure all your hair stays in place, finish off with a few spritz of hairspray! And instead of headbands, you can also play up the look using a scarf!

2. Half down, half up twist
(Seen on Pinterest)
Begin by separating your hair at the crown. Using a fine tooth comb, start by teasing the hair and coming it toward your scalp. Smooth the hair out to cover the teased area, and secure that top section of hair, up at your crown, with a few bobby pins inserted horizontally. Separate a section of hair in front of one ear and twist it toward the back. Position the twist on top of the previously inserted pins to cover them. Insert a bobby pin or two into the twist to secure it. Repeat on the other side. Check the back of your style with a hand mirror and make sure all the bobby pins are covered. Stretch out the twists if you need to. Finish with a mist of hairspray.

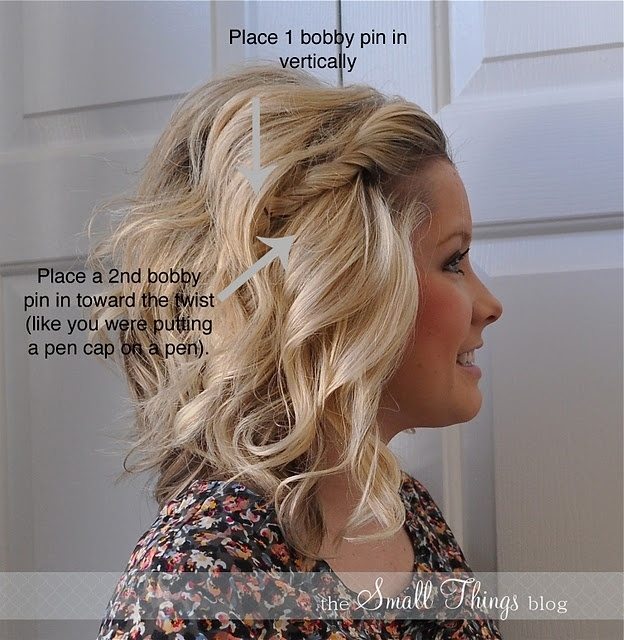
3. The two bobby pin front twist
(Seen on Pinterest)
This look is super easy to do, and only requires securing one bobby pin vertically over your lock of hair and the other in towards the twist. The two bobby pins should form an “x” at the end.

4. Twisted side ponytail
(Seen on Pinterest)
Start by pinning a small section of your hair at the back of your neck. Pull small sections of hair across and pinning along the base of the neck. Continue this process until you’re able to gather all your hair into a side ponytail, leaving a small section open in the front. Secure the ponytail with an elastic, and take the loose section and wrap it around the elastic to hide it.

5. The Low Knot
(Seen on Pinterest)
For this look, all you have to do is separate your hair into two pieces and follow a cross-over, looping motion as if tying a show. Repeat this process twice, secure the knot with an elastic, Repeat the pattern twice, secure the knot with a clear elastic, and tuck the ends under the knot. To make sure the knot stays in place, secure with a few bobby pins and a few spritz of hairspray.

6. Asymmetrical chignon
(Seen on Pinterest)
This is a fairly simple undo, and starts by teasing hair at the top of your head. Secure your hair in a side pony tail. Twist the pony tail around in your fingers and wrap it up in a bun. Keep the look in place with a fair amount of bobby pins and some hairspray.


